

I have finally replaced the picnic table!! Well, it had to be done before Christmas, but I am glad that table (bought at an expensive camping shop in the New Forest last year) has really had its money’s worth now!
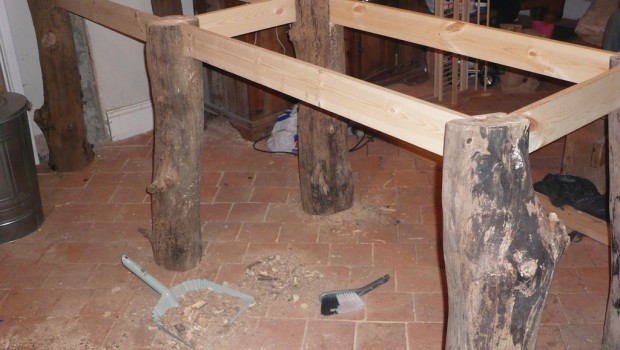
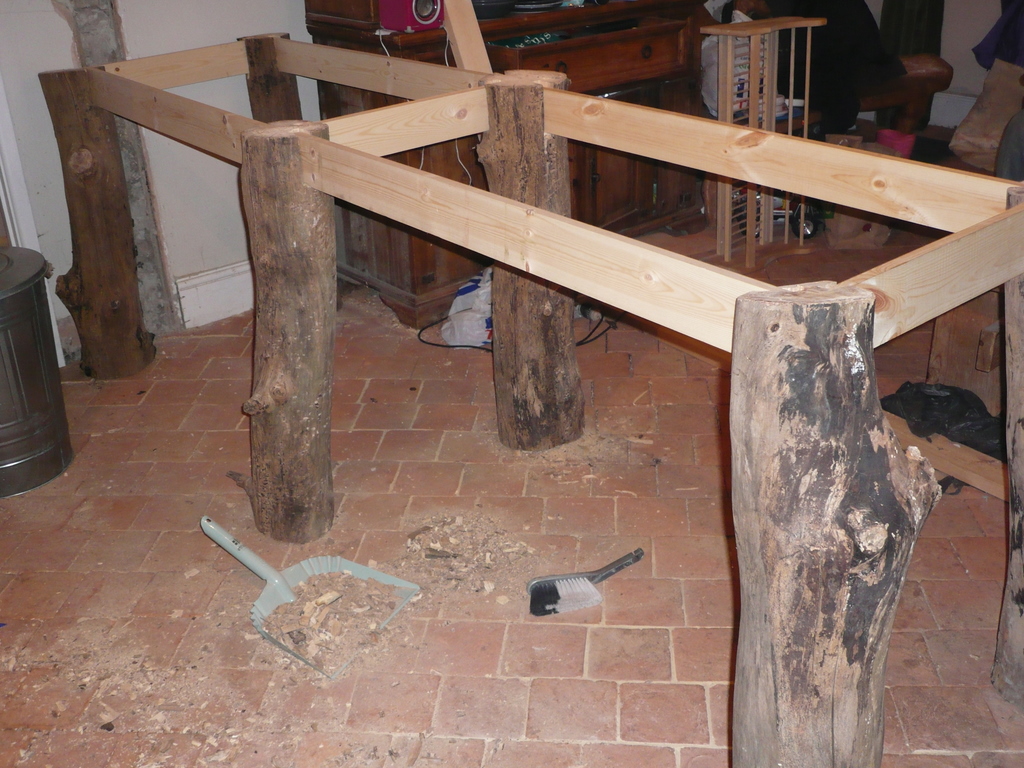
Last summer we paid the farmers across the way £20 to use their machines to drop a few tree trunks over the fence for us. They were cutting several down before putting up a new fence. At the time we wanted the trunks to build book shelves in the living room. However, it turned out that most of them were too short to reach the ceiling and anyway, we moved the settee back so there’s no space for the books in the living room any more. The books have been assigned to the hall on cheap Ikea bookshelves till we do the hall up and build in nicer ones at that point. So instead, we decided to use the tree trunks as legs for the kitchen work surface.
I very nearly bought furniture for this several times. I decided on a lovely long table from Wells Reclamation with unusual curved sides and lovely country carving on the drawer fronts. Then I changed my mind and wanted an elm table with useful deep drawers. I watched many variations on tables, sideboards, islands and butchers blocks on ebay, but none of them matched what we really wanted. The biggest problem was most things were too low to be at work surface height. So in the end, Chris said he’d make me what I wanted.
A long stretch of slate would be perfect, but didn’t seem to be available in the length we

Coming together
needed, so we bought two shorter pieces and that led to Chris needing a wooden frame to go between them and round the edge. I dithered between polished and riven slate for some time. My head was drawn towards the polished slate due to being much easier to clean (Mum’s influence!), but my heart was drawn towards the riven slate. I went with the latter in the end because I felt it would suit the kitchen better, and it cost £40 each piece. The wood needed for the frame and the hardboard pieces that he put under the slate came to about £80 from the DIY place in Shepton Mallet. Wells Reclamation sold the piece of wood for the shelf to us for £10 (It’s pretty rotten and full of worm holes). So, altogether the whole thing cost £150, which I don’t think is bad at all. (Plus there’s still 5 tree trunks we haven’t used yet.)
The pictures show everything coming together, and I love the finished thing. I think it’s amazing how Chris managed to get the thing flat – the floor isn’t and nor are the cuts made in the tree trunks, which are quite wonky anyway! But a lot of effort; sawing and drilling and laying the spirit level all over the place; he did it! The only job left to do is nail the shelf down to the supports. Somewhere I have kept a jar of handmade square-headed nails that I levered out the beams in the knocked-down living room wall. As they will show, I’d rather wait for those to turn up than use modern nails. I waxed all the new wood with ‘Stripped pine’ Fiddes wax which has a lovely finish. The slate had the same sealant treatment brushed on that we had left over from doing the sink. I treated the shelf and the legs with woodworm killer and then waxed the shelf with clear beeswax. I still have the legs to do actually, but ran out of time before Christmas.
I am so pleased I can’t tell you! Considering I haven’t had a work surface since May, it was an absolute joy to prepare Christmas dinner on here.

