

The timing for this experiment was important: I needed the weather to be good enough to be able to hang fabric outside to dry, but cold enough for us to still have the Rayburn lit so that I wouldn’t have to use the electric hob for hours on end to heat the dye pan…
And that is one thing to consider when taking up natural dyeing as a hobby – are you happy to have the hob on for long periods of time? I have to say, it’s definitely an advantage if you have an Aga or Rayburn or similar stove permanently running.
I would like to use dye more often for my clothing business, Threads of a Fairytale. As I usually mix several different pieces of fabric to make a dress, I think it’s nice to blend them together by using a dye afterwards. However, I have concerns about using chemical dyes and wanted to see what results I could achieve with alternative natural dyes.
I have experimented for a long time with natural dye printing, using leaves and plants from the garden, however I’m after different colours and sometimes, more predictable results, so that is why I bought the Fibrecrafts natural dye kit.
The Fibrecrafts natural dye kit
So let’s start with the contents of this kit: The dyes were alkanet, marigold, elderberry, logwood chips, turmeric, madder and forest green. The ‘forest green’ was a mix of fermented natural indigo, alkanet and pomegranate. There was also a pack of different mordants to try: (Mordants, by the way are used to treat the fabric so that the surface is ready for the dye to stick to it, and hopefully prevents it from washing out.) Alum, chrome, copper, iron and tin. There was also a skein of Yorkshire wool.
There was not very much in the way of instructions, and most of what was given related to wool, not fabric. So there was a piece of paper telling us how much of each mordant to use per 25g of wool, and how much of the dyestuff to use for each 50g of wool. There was also a piece of paper with dyeing instructions specifically for the Forest Green dye, and that referred to silk as well as wool. These were very detailed with specific temperatures, and we were even meant to have a water and citric acid solution at pH2 (because we all have pH level testers at home, don’t we?!).
Needless to say, I did not follow those instructions particularly accurately. Perhaps if I had, I would have had better results, but I have come to the conclusion that I am too imprecise and impatient for natural dyeing. At least, to do it properly.
My method for natural dyeing
In the past, I’ve had good results from adding the mordant to the dye pot and doing both at the same time. I was at least patient enough to mordant the fabric first this time, however, often not for very long, and then I’d pour in the dyestuff to the same water. I had a ginormous pan, and it was heavy to move between the stove and the sink, ok?! I also didn’t bother making dye bags from muslin, so I just tipped the stuff into the water on top of the fabric and stirred it in. Yes, that did cause a bit of trouble when it came to picking some of it out afterwards – particularly the logwood chips in the cotton gauze.
I dyed about 1 x 1.5 metres of silk and cotton gauze each time, and the results were entirely different. The silk took the dyes fairly well, but not the cotton at all. In fact, the cotton result was so bad, I’m wondering if I had bought a batch that had been treated differently to the cotton I’ve bought in the past. However, it may mean that cotton doesn’t work well with alum – I’ve always simply used salt as a mordant for cotton before. Oh yes – back to the mordants. I was about to have a go with using chrome, when I thought I’d better google it, as the instructions didn’t say much about it, and I had heard that some mordants should be treated with caution. Well, I think I was right to check, because the information I found on the internet was that all of the substances provided in the kit, apart from the alum, were pretty dangerous to use. The advice was to keep a lid on the pan in a well ventilated room – ideally outside. A couple of them were particularly poisonous. At first I thought they were being overly dramatic, because surely this wouldn’t be provided in a home dyeing kit with no warnings? However ALL of the websites I looked at said similar things, so, as it was freezing cold March and the window is a fair distance from the cooker; and I didn’t have a lid to fit my giant pan; I decided not to use all the other metals for mordants, and instead, bought some more alum from Amazon.
All the dyes (apart from alkanet) had at least two full days of soaking in the pan on the top of my wood-fired Rayburn, so it would have been various temperatures, cooling quite a lot each night. I then left them in a bowl of the dye for another couple of days, and then I hung out to dry in the shade. They were then left in a bundle in individual plastic bags for two months before I hand-washed them with detergent for silk.
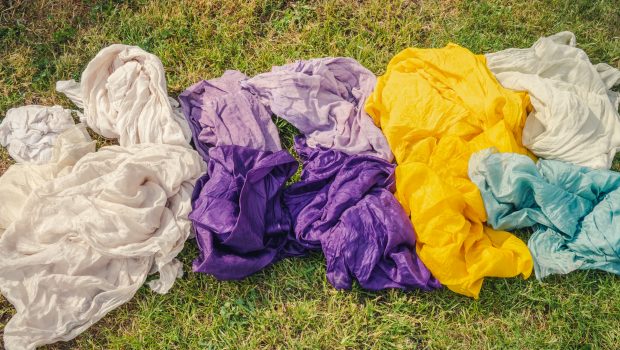
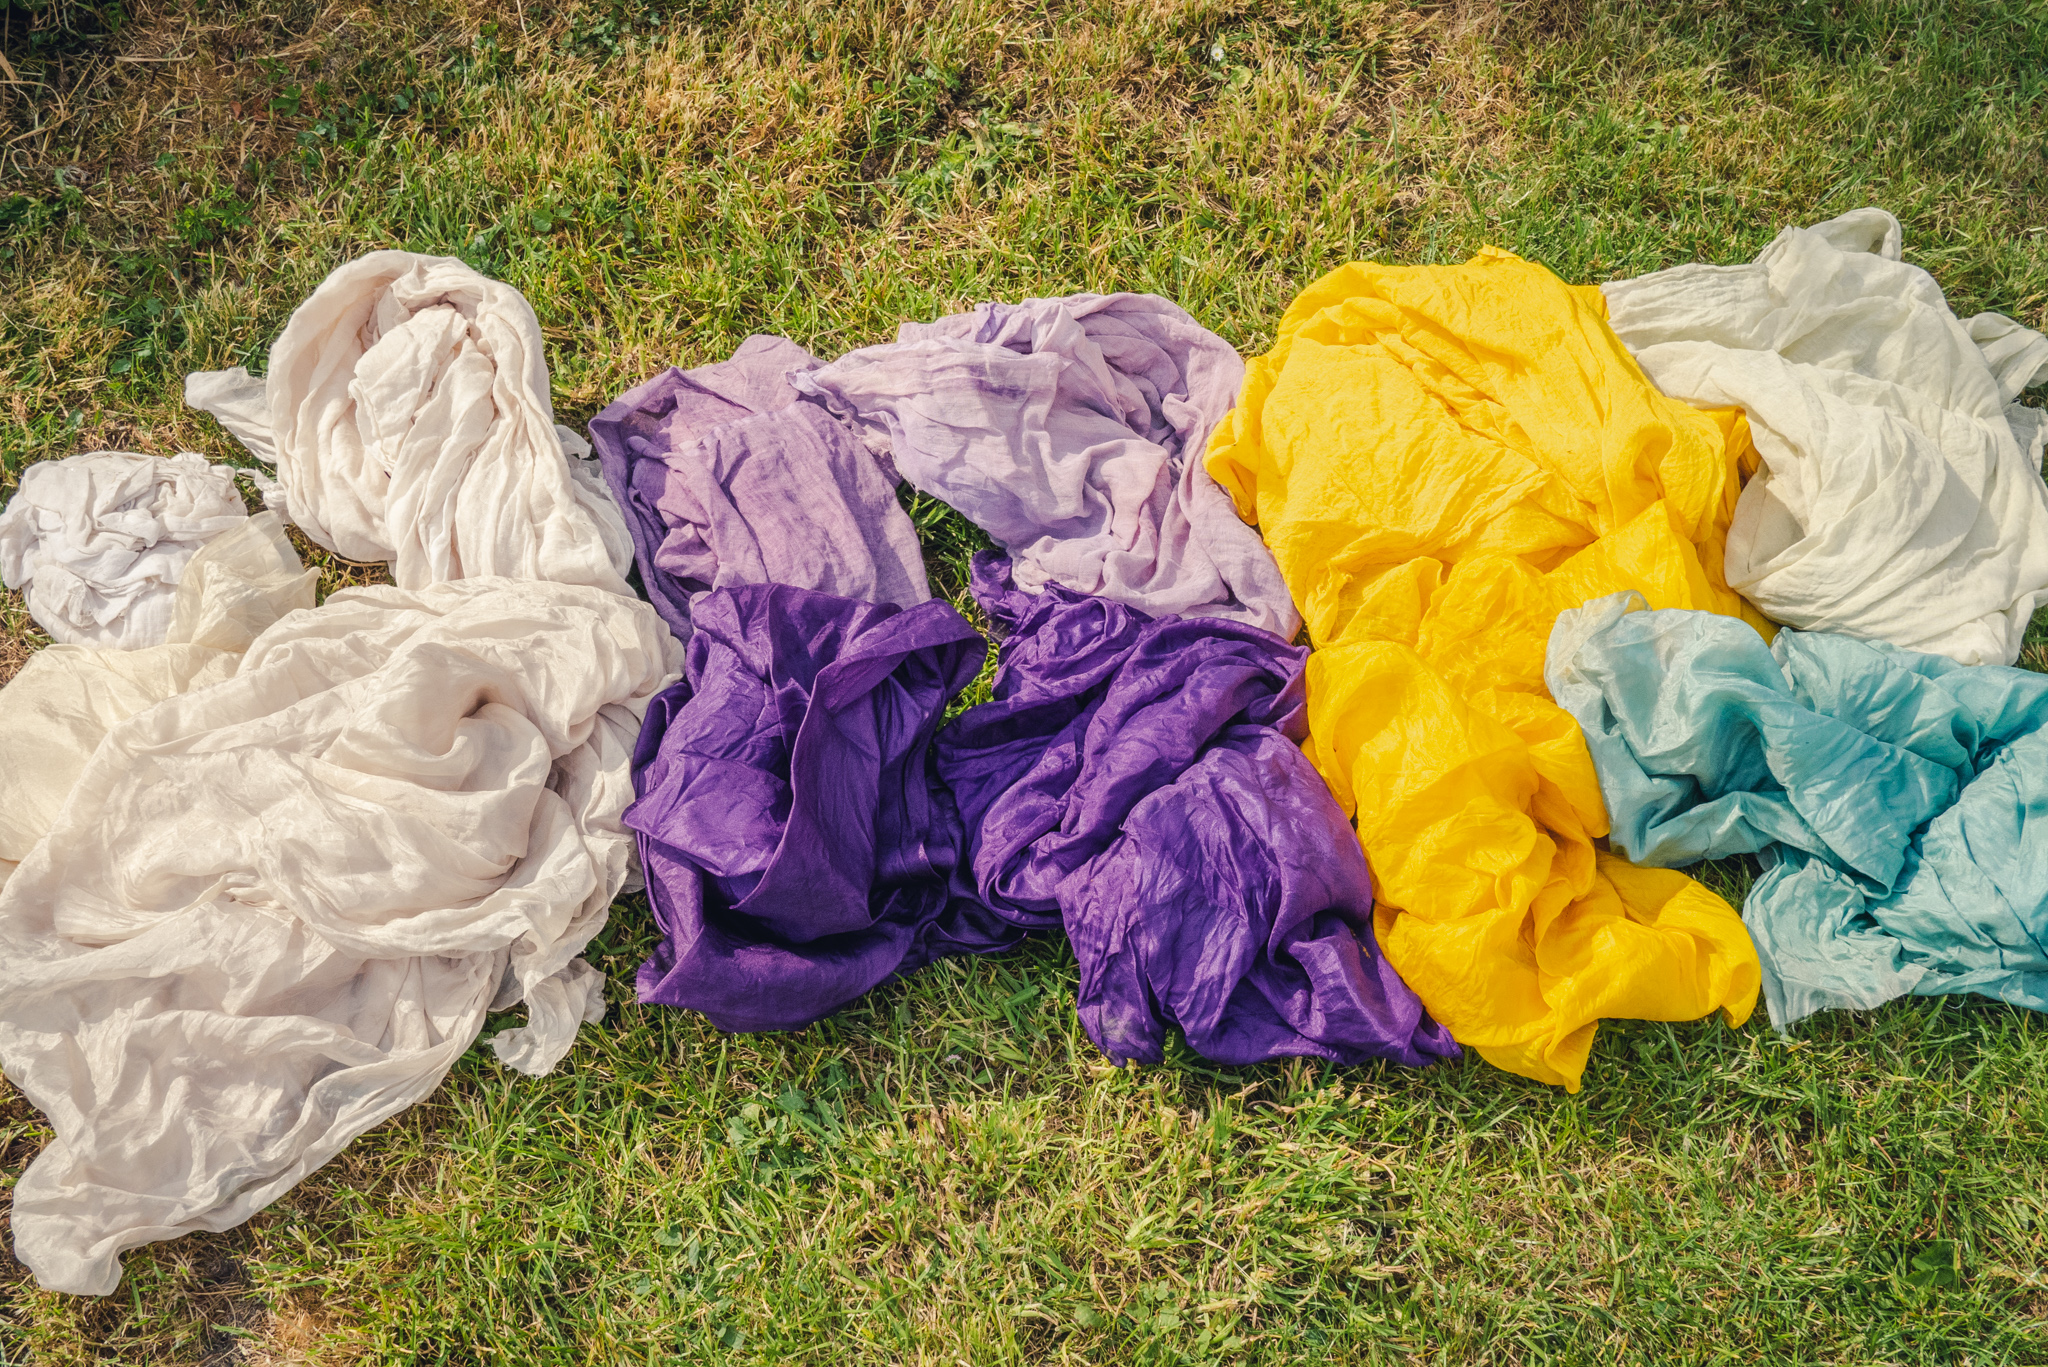
Natural Dyeing results
The best way to see the outcome is to look at the video below, but in conclusion, here are my results:
Alkanet root: I actually tried this one two years previously and so didn’t have exactly the same method as the other natural dyes. If I can remember rightly, the fabric was only left to soak with the dye for about three or four hours and I probably washed it out straight away. I also wrapped the pieces of root within the fabric, so I was left with purple dots, but the rest of the fabric remained white. Due to there being no information provided, I didn’t realise at the time that alkanet root is quite insoluble in water and needs several days soaking for the dye to be released. Therefore I can’t say whether I would use it regularly in the future, but I’d definitely give it another try now I know a bit more about it.
Marigold flowers: Very pretty, but very pale. It’s a pretty pale cream colour that if a bride requested I would use this dye for silk, but otherwise I wouldn’t bother.
Elderberries: Again, too pale to bother with probably. Despite elderberries being a rich wine colour, the dye came out a grey/beige shade – greige if you will. It would only be if I wanted to try and get that particular tone again that I would use this. And I’d probably pick my own rather than buying it!
Logwood chips: Produced a gorgeous Cadbury purple colour and the dye went a long way. I was able to chuck in double the fabric; I also dyed the wool that came in the kit, and have saved some of the leftovers in a jar because I think there is more to come still! I would definitely try this again instead of Dylon or Rit dye.
Turmeric: Produced a rich deep mustard yellow – the nice sort! I loved it actually, and I expect I could have dyed a lot more fabric too. This was the only dye that significantly washed out, so I would be interested to find out whether that keeps happening – I’ll have to experiment further. However, I would definitely dye with turmeric again instead of chemical dyes.
Madder: I lost it! Seriously, I have looked everywhere for my madder sample and I can’t find it! I can tell you that the fabric took the madder dye really well, and it was a lovely autumn russet red. Unfortunately I have no idea if it would wash out again or not – sorry! The dye was definitely rich enough for me to try madder again.
Forest Green: I probably would use this again, but only when I don’t need accurate results. The instructions said I should have had a deep green result, which I definitely didn’t get, so that pH level probably needed to be more precise than chucking in some extra vinegar! Again, I’d only use it on silk, not cotton.
Here’s the link to the George Weil craft website where I bought my kit from. It looks like it’s changed slightly since I bought mine – it no longer contains madder dye, but does include cream of tartare, which my instructions said wasn’t necessary. Anyway, I think it’s a good value way of trying some different natural dyes to see if you want to buy them individually in future.
Have you tried dyeing with natural ingredients? How did you get on? Which are your favourite dyes?


tanya
August 26, 2022to be fair, ph papers cost pennies on ebay and if you dye regularly you should keep them in stock, but the reccomended ph2 is basically concentrated sulphuric acid and is completely unachievable using vinegar and tap water, so I’m utterly confused by the indigo instructions